Putting a celebrity's head onto your own photo, the beginner way
Pick a free AI face swap tool, upload the celebrity image as the source face, upload your own photo as the base, and let the tool blend the two. The celebrity supplies the face. Your photo keeps everything else: the body, the background, the clothes. No Photoshop, no layers, no editing skill. Most tools finish in a few seconds to a couple of minutes, and the realism comes almost entirely from the images you feed in, not from settings you tweak.
What 'swapping a celebrity head onto your photo' actually means
Direction matters here, and most guides get it backwards. You are not dropping your own face onto a celebrity's picture. You are taking the celebrity as the incoming face and placing it into your photo, which stays the target photo and holds the scene together. Get that the wrong way round and the tool swaps the wrong person.
Now decide how much of the celebrity you actually want. A face-only swap moves the eyes, nose, mouth, and skin while keeping your own hair and hairline. A full head swap brings the celebrity's hair along too. That second choice only matters when the hairstyle is part of the recognition: a signature cut, a distinctive color, a shape people associate with that person. If the face alone reads as them, stay with a face swap and skip the extra complexity.
The blending itself is automatic. The AI reads facial landmarks on both images, warps the source to fit your photo's angle, and matches edges so the transition disappears. You do not paint masks or feather edges. Your only real job is choosing two images that give the model a fair chance.
What you need before you start
Two images decide everything. The first is a clear, front-facing photo of yourself, evenly lit, with almost no motion blur. The second is the celebrity image, and this is where beginners lose the result before they even click Generate.
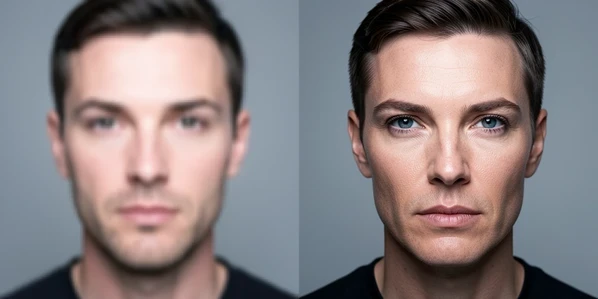
Resolution is the big one. Seaverse notes that blurry or low-resolution celebrity images cut realism, so the swap comes out soft and obviously fake. A sharp, high-resolution target gives the model real detail to work with. Beyond sharpness, the two faces should roughly agree: a similar head pose, a comparable angle, and a matching expression. A grinning celebrity dropped onto your neutral portrait fights the blend instead of helping it.
- A clear, front-facing photo of yourself, even lighting, minimal blur.
- A high-resolution celebrity image, since low-res targets reduce realism.
- Matching head pose and a similar expression across both shots.
- No sunglasses, hats, hands on the face, or heavy hair covering the face in either image.
That last point catches people out. Sunglasses hide the eyes the model needs to anchor the face. A hand across the jaw or a hat low on the forehead removes landmarks. Pick the cleanest celebrity photo you can find, even if it is not your favorite pose, because expression matching and clear features beat a dramatic shot every time.
Step-by-step: swap a celebrity head onto your photo
Here is the core workflow in a browser, using Pixlr's AI Face Swap as the concrete example. The pattern carries over to almost any tool.
- Open the Pixlr website and select the AI Face Swap tool. Nothing to install.
- Upload the celebrity image as the source face, using a clear, high-resolution, front-facing shot.
- Upload your own photo as the target, or pick a template, then hit 'run face swap'.
- Click the finished image to save it. Pixlr downloads the result in PNG format within a few seconds.
Click Generate and wait. That pause is the model warping and blending. Most free tools land in seconds, and the heavier ones take up to a couple of minutes on a busy plan. When the preview appears, study the hairline and jaw before you download. If it looks right, save it. PNG is the common default, though some tools offer JPG, WEBP, and more.
When you want the hair too: a full head swap
Say the celebrity's signature hairstyle is the entire joke or the entire point. A face-only tool leaves your hair on their face and kills the effect. Switch to a head-swap tool like Facy instead. Sign in with Google or email to claim free credits, upload the celebrity head as the source, then upload your photo as the target body.
Before you generate, look for a 'Customize the swap' option. Facy lets you add a short prompt such as keep glasses or keep eyes open, which tells the model to preserve features it might otherwise drop. Add the prompt, click Generate, preview, and download. That one line is the difference between a celebrity who kept their trademark glasses and one who mysteriously lost them.
Free tools that work for a celebrity-head swap
Free quotas, sign-up rules, and whether a tool handles a full head all differ, so match the tool to the job rather than grabbing the first result. For a single still photo where the face is enough, any of these work. For the hair, you need a true head-swap tool.
| Tool | Free tier | Sign-up | Notable for |
|---|---|---|---|
| Higgsfield | 5 free image swaps per day | Yes | Generates in 30 seconds to 2 minutes depending on plan |
| Wefaceswap | Up to 15 free images, plus 30 seconds of video daily | Yes | Many output formats including JPG, PNG, WEBP, GIF, MP4 |
| Remaker | Free face swap | No sign up | No watermark on results |
| Facy | Free credits after sign-in | Yes | Full head swap with hair, plus a customization prompt |
A few specifics worth knowing. Higgsfield gives you 5 free image face swaps a day to test the core technology, with generation running from 30 seconds up to 2 minutes by subscription type. Wefaceswap allows up to 15 free images daily plus 30 seconds of video. Remaker advertises both no sign up and no watermark, which makes it the fastest path to a quick result. Facy is the one to reach for when hair is in play.
Why your swap looks pasted on, and how to fix it
A pasted-on look almost always traces back to the input images, not the tool. Each failure has a mechanical cause and a one-step fix.
- Blurry or soft result: the celebrity image was low-resolution, so the model had no fine detail to render. Re-pick a high-resolution one.
- Floating, misaligned head: the angles disagree, because a front-facing base blends poorly with an off-angle source. Choose a front-facing celebrity image to match your front-facing photo.
- Smeared eyes or jaw: sunglasses, a hand, or heavy hair hid the landmarks. Swap in a cleaner image without obstructions.
- Lost glasses, smile, or makeup: the AI dropped a feature it was not told to keep. Add a
keep glassesorkeep makeupprompt and regenerate.
The off-angle case is the most common ruin. You find a striking celebrity photo shot from the side, drop it onto your straight-on portrait, and the head sits at an impossible tilt. The fix is not in any slider. Go back, find a front-facing image of the same celebrity, and run it again. One tip that quietly helps the most: match the lighting direction of the celebrity image to your own photo, so skin tones meet without a visible seam.
Is it legal? Celebrity likeness, consent, and labeling
For personal fun, you are mostly fine, but the boundaries are real and worth knowing before you post. Seaverse puts it plainly: face swapping for personal use is generally acceptable, provided you use images you have the right to and steer clear of fraud, harassment, or impersonation. The trouble starts when a private joke becomes a public claim about something the celebrity never did.
Two limits tighten things further. Commercial use of a celebrity likeness is restricted, and tools reflect that: Higgsfield includes commercial rights for marketing or business use only on its paid Pro plans. And consent is enforced at the upload stage. Facy requires you to confirm you hold the legal right to upload and edit the image, plus permission from anyone depicted, and it prohibits any material showing people under 18. Higgsfield runs strict policies against non-consensual or harmful generation.
When you share the result publicly, consider labeling it as AI-generated. It is a small line of text that keeps you on the right side of disclosure norms and signals the image is a swap, not a real moment.
What happens to your uploaded photo
Your base photo is personal, so retention matters more than most beginners realize. The reassuring news: several tools delete uploads automatically. Wefaceswap auto-deletes files within 1 hour and keeps no user data on its servers after processing. FlexClip removes your photo 24 hours after the generation. EaseMate deletes uploaded files once processing is done. If you are uploading something private, lean toward a tool with a stated deletion window rather than one that says nothing about it.