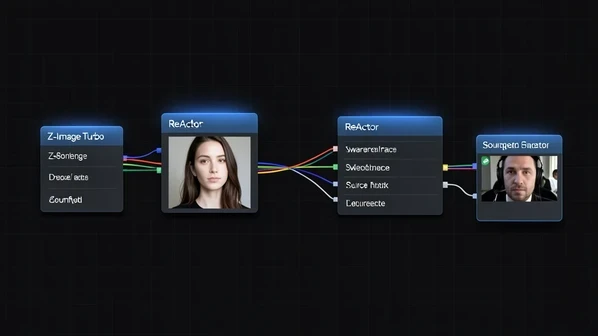
Chain Z-Image Turbo and ReActor into one local face-swap graph
Run the whole thing on your own machine in one ComfyUI graph: Z-Image Turbo paints the scene, then a ReActor node swaps your reference face onto it before the image ever leaves the canvas. Install the latest ComfyUI and ComfyUI Manager, drop the Z-Image models into their folders, generate at roughly 8 to 9 steps, then wire ReActor with retinaface_resnet50 for detection and inswapper_128.onnx for the swap. That single pass is the path most tutorials split into two unrelated guides.
What you're building: Z-Image Turbo plus ReActor in one pass
Z-Image Turbo is a distilled text-to-image model from Alibaba's Tongyi Lab, tuned for very short sampling. Comfy's own docs put it at 8 NFEs (number of function evaluations) for a 6B-parameter model that still matches or beats heavier competitors. Short steps mean you spend your time on the swap, not on waiting for the base render.
Post-generation face swap is the order of operations here. You generate the target image first. Then ReActor reads a separate reference photo and pastes that identity onto the rendered face. Nothing about the base prompt has to describe the person you want; the swap stage handles identity on its own.
Why bother wiring both into one graph? Because the popular guides stop halfway. One set explains Z-Image Turbo generation. A different set explains ReActor swapping on some other base model. Connecting Z-Image Turbo's distilled quirks to a ReActor swap, in a single beginner node graph, is the gap this walkthrough fills.
Hardware and prerequisites
Can you run Z-Image Turbo locally? Yes, on a fairly ordinary card. The model fits inside 16GB of VRAM, which is the recommended target, and Comfy notes sub-second latency on data-center H800 GPUs. Drop below 16GB and you still have a route: the fp8 all-in-one checkpoint runs on 8GB GPUs and on 16GB Apple Silicon Macs.
Two pieces of software come first. Install the latest ComfyUI, and install ComfyUI Manager alongside it. Manager is what pulls in any missing custom nodes and dependencies later, so skipping it almost guarantees a stalled workflow on first load.
For the swap itself you need a few extra assets:
- The ReActor custom node, installed through Manager.
inswapper_128.onnx, the core swap model.- Face detection and face restoration models that ReActor calls during the swap.
Step 1: install Z-Image Turbo models in ComfyUI
Update ComfyUI through Manager and restart before you touch anything else. A stale build is the single most common reason the workflow opens with red, missing nodes, so clear that risk up front.
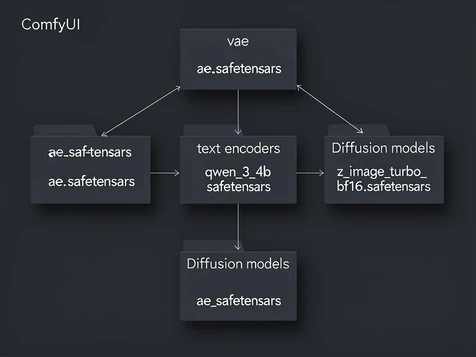
Three files go into three specific folders. Get the destination right and the loader finds them silently; get it wrong and the workflow throws a missing-model error that looks like a node problem.
| File | ComfyUI folder |
|---|---|
| ae.safetensors | models/vae |
| qwen_3_4b.safetensors | models/text_encoders |
| z_image_turbo_bf16.safetensors | models/diffusion_models |
With the files in place, load the Z-Image workflow by dragging its file straight into the ComfyUI window. The canvas rebuilds the node graph for you. No manual node assembly needed at this stage.
Step 2: generate your base image with Z-Image Turbo
Write a positive prompt that describes the scene and pose you want, then run. Z-Image Turbo lands a result in about 8 to 9 steps while staying under 16GB VRAM, so the base render is quick. On a MacBook Air M4 with 16GB, expect closer to 3 minutes for a 1024x768 image, per stable-diffusion-art's testing.
Now the quirk that trips up beginners. Turbo is distilled, and distilled means it largely ignores negative prompts. Type all the "no blurry, no extra fingers" text you like and it mostly does nothing. If a project genuinely needs negative guidance, switch to Z-Image Base instead of Turbo.
There is one exception worth holding onto. On the all-in-one workflow covered later, negatives do start to bite once you set CFG to 1.2 and push steps to 12 or more. On the plain Turbo graph, treat negatives as off and lean on a sharper positive prompt.
Step 3: add the ReActor face-swap node
Install the ReActor node through Manager, and let it pull its companion detection, swapping, and restoration models. Then add a single Load Image node and point it at your reference face. This is the photo whose identity gets transferred.
Wiring is where people cross the inputs. The generated image from Step 2 becomes ReActor's input, the target it paints over. The reference photo is the source. Swap those two and you get your generated face copied onto itself, which is a confusing no-op.
Set three model fields on the node and the swap behaves. Segmind's ReActor guide recommends these exact picks:
- Face Detection:
retinaface_resnet50. - Face Swapping:
inswapper_128.onnx, which operates at 128px. - Face Restoration (optional): CodeFormer, for cleaning up the result.
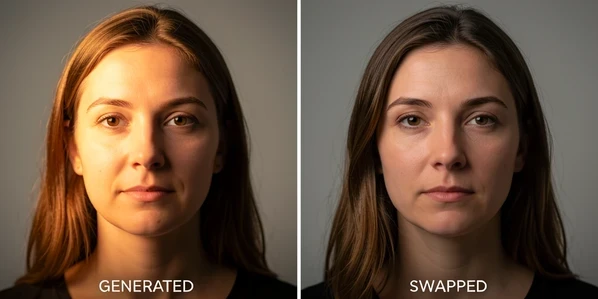
Run the full graph. Z-Image Turbo renders the scene, ReActor swaps the reference identity onto the rendered face, and the finished swapped image appears in one execution. A reader question on tutorials like this comes up often: can you skip generation and feed a stock photo straight into the swapper? You can, since ReActor only cares about its target input, but this guide keeps the Turbo render as the target so the workflow stays end to end.
Shortcut: the fp8 all-in-one workflow for low VRAM and Macs
Short on VRAM or tired of placing files by hand? The Sarcastic TOFU all-in-one workflow does both jobs in one pass: it generates with Z-Image Turbo and auto-swaps the face with ReActor, no manual model wiring between them.
Its trick is the fp8 all-in-one checkpoint, which bakes CLIP and VAE into a single file. That packaging is light enough to run on 8GB VRAM GPUs and on 16GB Apple Silicon Macs, so the hardware that struggles with the full three-file setup can still finish a swap.
Same negative-prompt rule applies, just more usable here. Load your reference face, enter positive and negative prompts, then set CFG 1.2 and 12 or more steps so the negatives actually filter the output. Those defaults are the optimized settings for this workflow, so start there before experimenting.
Settings card for low-end hardware: fp8 all-in-one checkpoint, CFG 1.2, 12+ steps, runs on 8GB VRAM or a 16GB Apple Silicon Mac. See the Sarcastic TOFU all-in-one workflow for the file.
Troubleshooting the swap
Most failures here have one cause each, and one matching fix. Match the symptom you see to the row below rather than changing several settings at once.
Missing nodes when the workflow loads
Some core nodes simply do not exist in an older build, so they fail to import at startup and show up red. Update ComfyUI to the latest or Nightly version through Manager, then restart.
The swapped face is misaligned
The lightweight mobile0.25 detector can miss the face landmarks and place the swap off-center. Switch the detector to resnet50 and alignment tightens up. It is worth choosing retinaface_resnet50 from the very start to avoid re-running a failed swap.
Skin tone or color does not match
Default VAE and color handling will not always reconcile two different source images, leaving a visible seam in tone. Try an alternative VAE, or enable color_transfer to pull the swapped face toward the target's palette.
Negative prompts do nothing on the TOFU workflow
On this distilled workflow negatives only filter outputs once guidance and step count are high enough. Raise CFG to 1.2 and steps to 12 or more. Below that, the model treats the negative box as decorative.
The result looks blurry
A 128px swap model can soften fine detail on a larger face. Add a face restoration step with CodeFormer or GFPGAN, or run the output through an upscaler or image-to-image pass to recover sharpness.
Responsible use
Swap only faces you have permission to use. Creating inappropriate or disrespectful content of real people or celebrities is strongly discouraged, and consent is the line that separates a fun local experiment from harm. Keep your reference photos to people who agreed to be in them.