Put one face onto another photo and make it look real
The fastest way to put one person's face onto another photo is a no-signup AI tool like Pixlr or PhotoFunia, which finish in seconds. Phone only? A free app such as PhotoDirector does it straight from your gallery. Need precise control over a tricky angle or clashing skin tone? Photoshop's layer mask method wins. Whichever route you take, one step decides whether the result looks real or obviously edited: matching the lighting and color of both photos before you upload anything. The decision tree below points you to the right tool first.
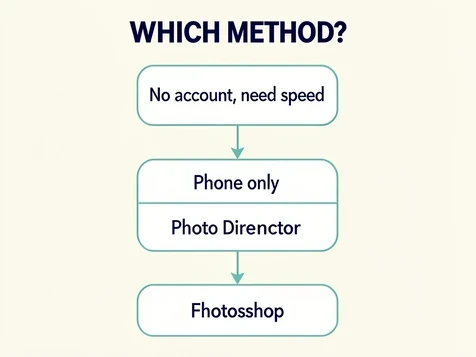
Which method should you use? (Decision tree)
Four questions narrow it down fast. Do you have Photoshop installed? Are you working on a phone only? Do you want to avoid creating an account? And does it matter to you whether the tool keeps your uploaded face on its servers?
- No account, want it done in seconds: a no-signup AI face swap in the browser (Pixlr or PhotoFunia) is the quickest path for beginners.
- Phone is your only device? Install a free mobile app like PhotoDirector and swap straight from your camera roll.
- Full control over a difficult angle, a mismatched skin tone, or a distorted AI result calls for the manual Photoshop layer-mask route.
Privacy tips the choice for some readers. Pica AI states it deletes uploaded photos within 24 hours, and EaseMate removes files from its server immediately after processing, so privacy-sensitive users keep safe AI options without dropping all the way to manual editing.
Before you start: prepare your photos for a convincing result
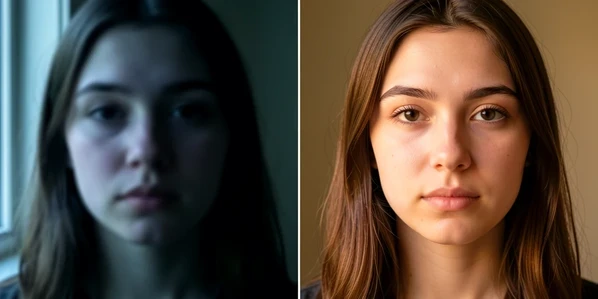
Mismatched lighting is the single biggest reason a face superimpose looks fake, so fix it before opening any tool. If the two photos were shot in different light, edit both to the same exposure, white balance, and color grading first. Skipping this step is what breaks the face overlay later.
- Match light direction and color temperature: a face lit from the left pasted onto a body lit from the right reads as fake instantly.
- Use a clear, high-resolution source photo with the face fully visible, unobstructed, and front-facing.
- Profile or steeply angled faces lower AI face detection accuracy and often produce a lopsided blend, so favor a frontal shot.
AI tools are picky about input. EaseMate, for example, accepts PNG, JPG, JPEG, and WEBP files up to 10 MB. Crop tightly to the face when you can, since removing background clutter helps face detection lock onto the right landmarks.
Method 1: Superimpose a face online with no account (Pixlr or PhotoFunia)
Both of these run in the browser with no signup, and both hand back a downloadable image in seconds. Pixlr keeps it simple.
- Open the Pixlr AI Face Swap tool in any browser; no account is required.
- Upload the source face photo, the one holding the face you want to move.
- Upload the target photo, or pick a body or scene from Pixlr's template library.
- Click Run Face Swap and let the AI blend the face automatically.
- Click the result to download it as a PNG.
Pixlr also reassures cautious users, stating your creative output is entirely yours and your content stays private and secure. PhotoFunia takes a different angle with built-in color matching.
- Open the PhotoFunia Face Swap effect page.
- Choose the base image: the target body or scene that will receive the new face.
- Choose the face image you want to superimpose.
- Turn on Match colours from base photo when the two shots have different lighting.
- Click GO, and PhotoFunia detects the face and generates the result.
That 'Match colours from base photo' toggle is the reason to reach for PhotoFunia when your photos clash on color temperature. One click nudges the pasted face toward the base image's palette, doing the skin tone matching you would otherwise grind out by hand.
Method 2: Superimpose a face online with a free account (EaseMate or Pica AI)
Signing in buys more credits and, in some tools, multi-face support. EaseMate hands new users 30 free credits after login and runs its face merging on GPT-4o.
- Create a free account and log in to claim 30 free credits.
- Select the source face photo (PNG, JPG, JPEG, or WEBP, up to 10 MB) with a clear, front-facing face.
- Upload the target photo that will receive the face.
- Apply the face swap filter; the GPT-4o-powered blend finishes in seconds and spends credits per swap.
- Download the output as a PNG.
"To ensure your privacy, the files you uploaded will be deleted from our server after processing." (EaseMate)
Pica AI is the pick when one shot has several faces to fix. It supports up to 3 faces in a single photo, and processing wraps in seconds.
- Click Upload to select your target image, or start from a Pica AI template.
- Upload one to three source face photos.
- Click Swap to start processing.
- Download the finished image.
"We only use your photos for face swapping and delete them within 24 hours of upload." (Pica AI)
That multi-face support earns its keep on a group shot where one person blinked. Swap only the closed-eye face from another frame of the same person at the same event, and leave everyone else untouched.
Method 3: Superimpose a face on your phone (PhotoDirector for iOS/Android or Picsart)
No desktop? A phone handles the whole job. PhotoDirector is free on both iOS and Android.
- Download the free PhotoDirector app from the App Store or Google Play.
- Tap AI Face Swap on the home screen.
- Choose a target photo from the templates or upload your own.
- Upload your face photo, using a clear front-facing shot.
- Let the AI blend, then download or share the result.
Picsart works differently. Its AI Replace tool builds a face from a text description rather than a second photo, which suits stylized or fictional results more than dropping in a specific real person.
- Open the Picsart Web Editor and upload your target image.
- Click More Apps, then AI Replace.
- Brush over the face you want to replace.
- Choose Replace, then type a description of the new face or pick a preset.
- Click Generate Image and export the result.
Watch the watermark trap. Copy Replace Photo Face Swap on iOS rates 4.5 out of 5 across 10K App Store ratings, yet its free tier saves only 6 faces and charges $4.99 to save your photo. Screenshot to dodge that paywall and the app permanently watermarks every photo you load into it afterward, not just the current one. Use the in-app save, or switch to a watermark-free tool like Pixlr.
Method 4: Superimpose a face manually in Photoshop (full control)
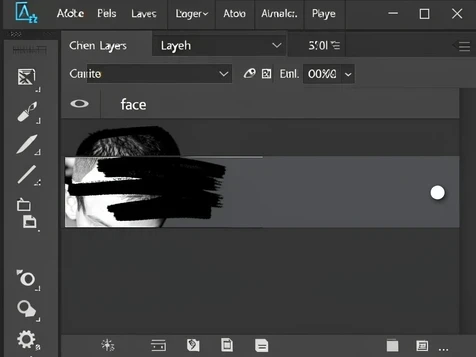
When AI chokes on an extreme angle or very different skin tones, manual editing in Photoshop gives control no automatic tool will. The workflow is a layer-mask blend, built from a clean face replacement layer.
- Open both images in Photoshop at the same time (File > Open for each).
- Use the Quick Selection Tool (W) to paint a selection around the face, including the forehead, chin, and cheeks but skipping the ears.
- Right-click the selection, choose Layer via Copy, and rename the new layer 'face'.
- Drag the face layer onto the target image with the Move Tool and position it roughly over the target head.
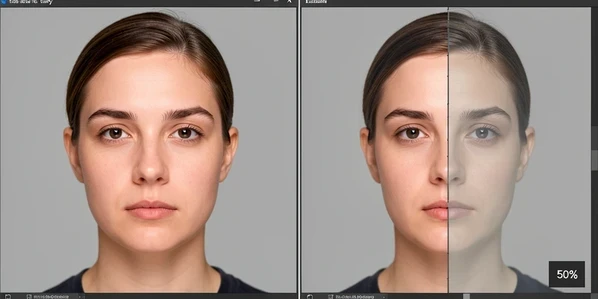
- Lower the face layer opacity to 50% so you can see through it, align the eyes, nose, and mouth to the head beneath, then return opacity to 100%.
- Click the Add Layer Mask icon at the bottom of the Layers panel.
- With the mask selected, paint with a soft black brush to erase hard seams and stray edges, then switch to white to bring back anything you over-erased. Zoom out often to judge the whole face.
Reach for this route over AI when the source face sits at an extreme angle, when skin tones differ sharply, or when an AI tool keeps producing distorted output. After masking, run Image > Adjustments > Match Color with the target layer active to harmonize the superimposed face's tone with the scene around it.
Common mistakes and how to fix them
Four errors cause most bad superimpositions, and each has a quick recovery.
- Mismatched lighting leaves a visible color and shadow seam at the face boundary; shoot both photos in the same light, or edit both to identical exposure and white balance before you start.
- Aligned the Photoshop face layer at full opacity? You cannot see the head underneath to line up the features. Drop to 50%, align, then go back to 100%.
- Blurry or partly hidden source faces break AI landmark detection and warp the output. Feed it a sharp, front-facing, fully visible face instead.
- Screenshotting past the Copy Replace paywall scars every future photo with a watermark; use the in-app save or a different tool.
Legal and ethical considerations
Only superimpose the face of someone who has explicitly agreed to it. Editing or sharing images of others without consent can cross legal lines around privacy and publicity rights, and responsibility for those permissions sits with you.
"Do not edit, modify, or share images of others without their explicit consent. Unauthorized use may violate privacy, publicity, or other legal rights." (CyberLink)
Never use a face superimpose to deceive, defame, or harass. On the data side, your uploads are not necessarily kept: EaseMate deletes files immediately after processing, and Pica AI removes them within 24 hours of upload, which matters when the face is sensitive.