ComfyUI face swap workflows: pick a method, place the models, ship the result
ComfyUI handles photo face swaps through three workflows worth installing: ReActor for a fast pixel-level swap, IPAdapter Plus for a face-consistent diffusion render, and InstantID paired with a SAM Detector when the target scene has strong lighting you must respect. ReActor is the recommended starting point because the node graph is short and the model list is small. The other two trade speed for quality on stylized or non-frontal targets.
Every method shares the same failure pattern. A misplaced model file, a default detector that misses angled faces, or a missing restoration pass produces output that looks pasted on. This guide pins each method to its exact model paths and verified parameters, then folds the recurring errors into a single troubleshooting section so you do not have to dig across forums.
Which ComfyUI face swap method should you use?
Start with the target image, not the tool. A clean front-facing portrait swaps cleanly in ReActor and rarely benefits from anything heavier. A stylized poster, a painting, or a scene with directional lighting needs a diffusion-aware method, because a direct pixel swap will keep the source face's lighting and break the composition. Use the table below to read off the right path in one glance.
| Method | Best use case | Required models | Difficulty | Key trade-off |
|---|---|---|---|---|
| ReActor Fast Face Swap | Photorealistic portraits with similar lighting | inswapper_128.onnx, GFPGANv1.4 or CodeFormer | Beginner | Fastest, but can look pasted on stylized targets |
| IPAdapter Plus | Stylized art, non-human targets, identity-locked generation | IPAdapter model, ViT-H CLIP vision encoder | Intermediate | Slower, needs +10 KSampler steps and parameter tuning |
| InstantID + SAM | Scenes with strong directional lighting, painterly targets | InstantID, SAM Detector, base checkpoint | Intermediate | Best lighting match, but the heaviest node graph |
ReActor is the most widely recommended starting point on Civitai, where the original ComfyUI Face Swap Workflow has accumulated 303 Very Positive reviews and 17,919 downloads since September 2023. If you have never built a face swap graph before, install ReActor first and only reach for IPAdapter or InstantID when ReActor's output looks visibly bolted on.
Prerequisites: models, hardware, and software you need before starting
Every cryptic load error in ComfyUI traces back to two things: a model in the wrong folder, or a missing Python dependency. Walk through this list once and you avoid most of the troubleshooting section entirely.
- ComfyUI installed locally, or a cloud ComfyUI environment with custom-node support.
- ComfyUI Manager installed so you can search and add nodes without git clone.
- Minimum 6GB VRAM (RTX 3060 or equivalent), per the comfyui.org ancient-beauty workflow guide, for any GFPGAN-enhanced pipeline.
inswapper_128.onnxplaced inComfyUI/models/insightface/.GFPGANv1.4.pthorcodeformer.pthplaced inComfyUI/models/facerestore_models/.- For IPAdapter: an IPAdapter model in
ComfyUI/models/ipadapter/and a ViT-H image encoder inComfyUI/models/clip_vision/. opencv-python(cv2) installed in the ComfyUI Python environment if you plan to use the Facerestore CF node.- A source face photo with clear features, a simple background, front-facing where possible, at least 512×512 pixels.
The face detection models that ReActor relies on auto-download to models/facedetection/ the first time the node runs, so you do not need to fetch those manually. Everything else is on you.
Method 1: ReActor Fast Face Swap (recommended for beginners)
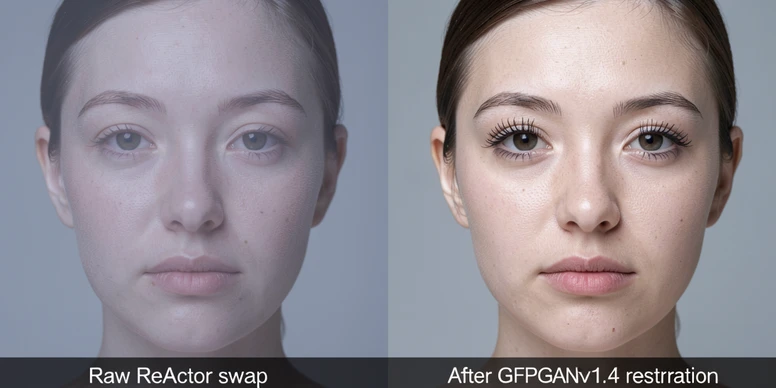
ReActor wraps the InsightFace inswapper model into a single node and pairs it with a restoration stage. The pipeline is two-step by design: the swap itself produces a low-resolution face, then the restoration model (GFPGAN or CodeFormer) sharpens it. Skip the second step and the output will look soft every time.
- Install the plugin. In ComfyUI Manager, search ReActor and click install. As a manual fallback, run
git clone https://github.com/Gourieff/comfyui-reactor-nodeintoComfyUI/custom_nodes, then executeinstall.baton Windows orinstall.shon Linux and macOS. - Place model files. Drop
inswapper_128.onnxintoComfyUI/models/insightface/andGFPGANv1.4.pth(orcodeformer.pth) intoComfyUI/models/facerestore_models/. These paths come from the Civitai workflow documentation and are not optional. - Add the node. Double-click the empty canvas, type ReActor, and pick ReActor Fast Face Swap.
- Wire the graph. Connect the VAE Decode output to the ReActor input image, attach a Load Image node carrying your source face to the ReActor input face, and feed the ReActor output into a Save Image node.
- Configure restoration. Set the enhancer to GFPGANv1.4 with
strength=1, switch the detector to retinaface_resnet50 from the default, and setface_boost=1for maximum facial detail. - Queue the prompt. The first stage produces a blurry swap; the second stage runs restoration and outputs the final image.
If you swap the same person repeatedly, save the embedding once using ReActorSaveFaceModel and load it as a .safetensors file on later runs. It removes the source-image preprocessing step and keeps the identity stable across batches.
Method 2: IPAdapter face-consistent generation
IPAdapter does not swap pixels. It conditions a diffusion model on your source face so a freshly generated image carries that identity, which is what you want for stylized targets, illustrated characters, or any scene where ReActor's pasted-on look ruins the composition. The trade-off: more nodes, slower runs, and parameters you must tune by hand.
- Install ComfyUI IPAdapter Plus through ComfyUI Manager, or git clone the repository into
ComfyUI/custom_nodes. - Create
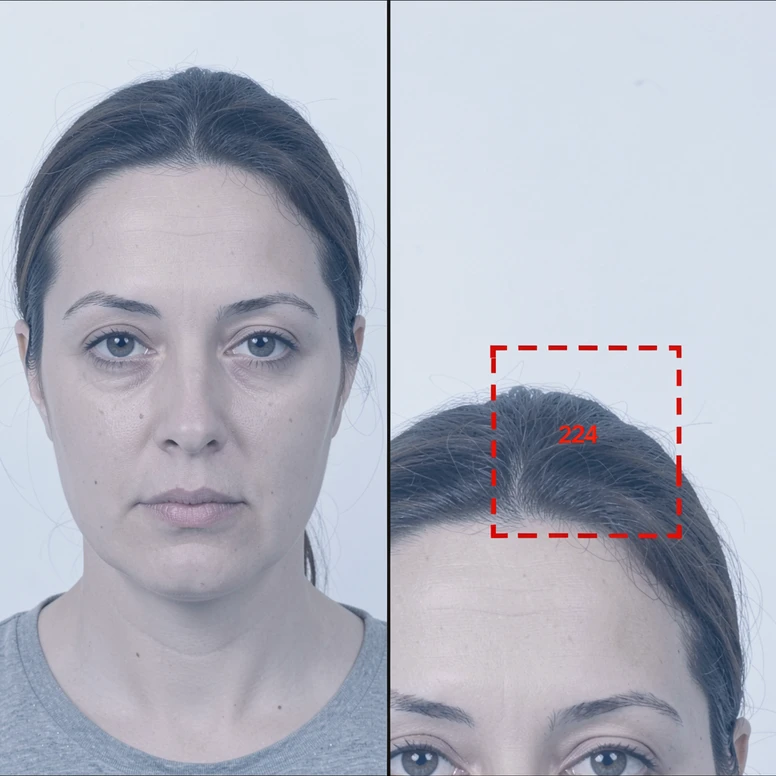
ComfyUI/models/ipadapter/and place the IPAdapter model inside. Put the ViT-H image encoder inComfyUI/models/clip_vision/. The Comflowy face-swap guide documents both paths. - Square-crop your source face with the face centered. The CLIP encoder resizes input to 224×224 and center-crops, so anything off-center is discarded silently.
- Add the Apply IPAdapter node, then connect three inputs to it: Load Image (source face), Load CLIP Vision (ViT-H), and Load IPAdapter Model (matched to your checkpoint).
- Set IPAdapter
weightbelow 0.8 andnoiseas low as 0.01, per the Comflowy parameter recommendations. - Raise KSampler steps by at least 10 above your usual count: if you normally run 25 steps, run 35 here. Drop CFG at the same time so the face has room to settle in.
- Queue the prompt. If you want a quick SD 1.5 versus SDXL comparison, run a second KSampler node in parallel from the same conditioning.
Expect to iterate. IPAdapter rewards small adjustments: a 0.05 change in weight can shift the output from generic to recognizable, and the right CFG depends on your base checkpoint. The reward is a face identity that survives stylization, which is exactly what direct swaps cannot deliver.
Method 3: InstantID + SAM for lighting-aware face integration
Use this workflow when the target scene has light coming from a clear direction (a window, a single lamp, a stage spot) or when the target is a painting whose color palette would betray any pasted face. SAM Detector masks the face region in the base image automatically, and InstantID conditions the diffusion pass on your source identity while honoring the target's lighting and texture.
- Install InstantID and SAM Detector custom nodes from ComfyUI Manager.
- Load both inputs: the base (target) image and the source face image, each through its own Load Image node.
- Pass the base image into SAM Detector so it generates a face mask automatically.
- Feed the source face and the SAM mask into the InstantID node, which applies face migration with internal complement model conditioning.
- Configure the KSampler exactly as the runninghub.ai InstantID recipe describes:
CFG=1, sampler euler ancestral, scheduler sgm uniform, noise reduction0.50. - Queue the prompt. The output face inherits the target scene's lighting rather than carrying the source photo's lighting forward.
InstantID is the right call when a ReActor output looks correct in shape but wrong in tone. Stage-lit performances, single-source window scenes, and any classical-painting target benefit the most. For everything else, the lighter ReActor path is usually enough.
Troubleshooting: fixing the most common ComfyUI face swap errors
Almost every failure you will hit lives in one of the seven boxes below. Read each one as a single mechanical cause and a single mechanical fix.
Error 1: model not found
ComfyUI nodes look for models in specific subdirectories and emit ambiguous errors when the path is wrong. Place inswapper_128.onnx in models/insightface/, restoration models (GFPGANv1.4.pth, codeformer.pth) in models/facerestore_models/, the IPAdapter model in models/ipadapter/, and the ViT-H encoder in models/clip_vision/. Restart ComfyUI after moving files.
Error 2: misaligned or failed face detection
The default mobile0.25 detector is lightweight and fails on non-frontal or low-resolution faces. Open the ReActor node config and switch the detector to retinaface_resnet50. This single change resolves most of the alignment complaints attributed to ReActor.
Error 3: color or skin tone mismatch
When the swapped face reads as a different skin tone than the target, the VAE is the lever. Try an alternative VAE, or enable a color transfer option if your node exposes one. For ancient, painted, or stylized portrait targets, load color101VAE_v1.pt through a VAELoader to maintain skin tone consistency, the same setup the comfyui.org ancient-beauty workflow uses.
Error 4: IPAdapter crops the face out
The CLIP vision encoder used by IPAdapter resizes input to 224×224 and center-crops. An off-center face in a portrait crop will be cut from the embedding, and you will get a generic result. Re-crop the source to a square with the face squarely on the center axis before loading.
Error 5: cv2 not found after installing Facerestore CF
Facerestore CF depends on opencv-python, which is not always present in the ComfyUI Python environment by default. Activate that environment and install it manually with pip install opencv-python. The error disappears on the next launch.
Error 6: blurry output after the swap
Raw inswapper_128 output is low resolution by design. If the result is still soft, your restoration node is not connected or not running. Wire GFPGANv1.4 with strength=1 after the ReActor node, or CodeFormer with fidelity=1.000, the default documented in the Civitai workflow.
Error 7: IPAdapter output lacks face fidelity
Standard KSampler step counts under-bake an IPAdapter generation. Add at least 10 steps over your normal value, then reduce CFG to give the face more room to converge. If you usually run 20, try 30; if you usually run 25, run 35.
Pro tips for better results
Source image quality matters more than target image quality. A grainy or oblique source feeds noise into every downstream node, while a sharp, evenly lit, front-facing source survives compression, restoration, and stylization.
- Make
retinaface_resnet50your default detector in every new ReActor graph. The mobile0.25 default is only worth keeping for batch jobs where speed beats accuracy. - Set
face_boost=1in the ReActorFaceSwap node when you need maximum facial detail preservation. - Save reusable face embeddings as
.safetensorsfiles via ReActorSaveFaceModel and reload them across sessions to lock identity across batches. - For painted or vintage portrait targets, load
color101VAE_v1.ptthrough a VAELoader so the swap inherits the target's color palette instead of fighting it. - Run an SD 1.5 and an SDXL KSampler in parallel from the same IPAdapter conditioning to compare both base models in one queue.
ok so before i burn a weekend on this, is reactor actually the easy one or is that just what every guide repeats? every workflow i open has like 40 nodes
reactor is the short graph yeah. vae decode -> reactor -> save image basically. the pain isnt the graph its where you drop inswapper_128.onnx
easy until it isnt. mine looked pasted on for weeks and the guide just says switch to retinaface like thats the whole story. it wasnt
small thing but the article says the facedetection models auto-download to models/facedetection/ on first run. that part is actually true, i watched it pull a few files on first queue
whats the real vram floor here. it says 6gb rtx 3060 but does that hold once you stack gfpgan restoration on top
same here on the vram question, im on a 3060 and reactor alone is fine but havent tried the heavy stuff
marketing fluff. nobody mentions reactor got pulled from a bunch of places, half my installs broke last year
wait whats the difference between gfpgan and codeformer, the table lists both like theyre interchangeable?
theyre not interchangeable really. codeformer has the fidelity slider, article even says fidelity=1.000 default. gfpgan you just set strength=1 and move on
@RanbooLive use gfpgan first, its more forgiving. codeformer at fidelity 1 can look plasticky on skin
anyone running this fully local with no cloud node support? i dont want my source faces touching some rented gpu and the guide kinda assumes either is fine
reading on lunch so skimming, but does the embedding save actually skip preprocessing or is that just hype for the node
the ipadapter path scares me budget wise, +10 ksampler steps every run adds up on a rented gpu. anyone done the math per image
noob q: where exactly is models/insightface/ ... i dont have that folder, do i just make it
@Piglet yes you create it. inswapper_128.onnx goes in models/insightface/, restoration models in models/facerestore_models/. i had 17 files in the wrong place when i started, classic
the troubleshooting section is the only useful part honestly. error 2, the mobile0.25 vs retinaface thing, thats most of the pasted-on complaints right there
ngl error 6 was me. swap looked soft and i didnt even have the restoration node wired lol. felt dumb after
one thing the guide skips, inswapper actually outputs at 256 internally so the softness is more about the detector than raw res. restoration just cleans the rest
will check from desktop tonight but does instantid really need the full sam detector or can you mask manually to save nodes
instantid graph is huge, opened it once and closed it. stuck with reactor
honest question nobody seems to answer: does color101VAE actually help on normal photos or only painted targets? article only mentions ancient/vintage
civitai says 17919 downloads since 2023, fine, but downloads arent reviews. 303 very positive out of 17k is kind of a low rating share if you think about it
sounds like a press release. recommended starting point on civitai, ok and
im so confused between ipadapter and instantid, both lock identity right? when do you pick which
@RanbooLive ipadapter conditions generation for stylized stuff, instantid respects target lighting. different jobs. the table actually splits this under key trade-off
still nobody answered the local-only thing. ill assume yes since its custom nodes but the privacy framing in these guides is always an afterthought
had a reactor case once where the same workflow gave totally different skin tone on two near identical photos, long story. vae was the culprit eventually
the safetensors embedding tip is the one thing i actually use. did 137 swaps of the same face last month, saving the model cut my queue time a lot
what does face_boost=1 even do, the article says max facial detail but is there a downside at 1
downside is it sharpens artifacts too if your source is grainy. learned that the hard way
the 224x224 center crop detail for clip vision is underrated. error 4 in the guide. i lost a whole evening before realizing my face was off-center and getting silently cut
wait the clip encoder just throws away whatever isnt centered?? thats brutal for portrait crops
@Dayshi how much gpu time per swap roughly, trying to budget a batch of like 4200 frames for a video and im scared
lurked this whole thread. the only thing that ever fixed pasted-on for me was retinaface plus a proper restoration pass, everything else was noise. wont repeat what others said
@Biofrost 4200 frames in reactor isnt insane, but dont use ipadapter for that, the per-frame step cost will kill you
kinda feel like this guide is written for stills not video though, nobody mentions temporal flicker
checked the comflowy weight numbers a year ago, might be different now, but weight under 0.8 and noise 0.01 matches what i had written down. cfg was the part i never nailed
on phone in the subway, will redo later, but the cv2 not found error bit me on a fresh install. pip install opencv-python in the right env, done
author clearly never shipped this at scale. one mention of batch and its a throwaway line about mobile0.25 being fine for speed
is there any free tier cloud that even supports custom nodes properly, every cheap one i tried blocked reactor
ok i got reactor working!! source face front facing, retinaface, gfpgan strength 1, looks clean. now i want to try instantid for a poster
be careful with random cloud nodes for that. your source identity is literally your face
the whole start with the target image not the tool line actually clicked for me. front portrait reactor, stylized anything else
except its not that clean in practice. i had front facing portraits still look bolted on because the lighting between source and target didnt match. reactor doesnt fix lighting
honestly the thing that still drives me nuts is how every restoration pass smooths out freckles and texture. face ends up looking like wax and no slider fully fixes it
thats the inswapper limitation, not a settings thing. you can recover some with lower restoration strength but then its soft. pick your poison
is codeformer fidelity 1 or 1.000 different, the article writes 1.000 and im overthinking it
same number piglet, dont overthink it
for the record the guide says minimum 6gb but gfpgan enhanced pipelines spike higher in practice. i saw 7.3gb peak on a 3060 12gb, never crashed but close on an 8gb card probably
thats the answer i needed, so 8gb card is risky for the restoration path. might just rent then
the someone above who mentioned temporal flicker, yeah that was me, still no answer lol
skimmed it ngl. troubleshooting good, the method 2 and 3 sections read like filler
poster swap with instantid kinda worked? lighting matched way better than reactor but the face drifted from the source a bit. is that the cfg=1 thing
cfg 1 with instantid is intentional per the recipe, euler ancestral, sgm uniform. drift usually means your source crop was weak
still want to know if anyone benchmarked sd15 vs sdxl in that parallel ksampler setup the article mentions. claims you can compare in one queue but never shows results
sdxl holds identity better in my runs but eats vram. the parallel trick works, the comparison is just eyeballing though, no real metric
ok last thing then i stop spamming, if reactor is fastest why would a beginner ever bother learning the other two...