Building a face swap photo montage from scratch: the two-stage workflow
A face swap montage is not a single click. You produce each swapped image first, then arrange those images into one composed canvas. Treating it as two jobs instead of one is the difference between a collage that holds together and a grid of mismatched panels that look like they came from six different photographers.
Below is the full pipeline. Stage 1 uses a free online face swap tool. Stage 2 uses a free collage tool. The middle section is where most beginners trip: preparing inputs so the panels match each other before any swap happens.
What a face swap photo montage actually is, and what you need to make one
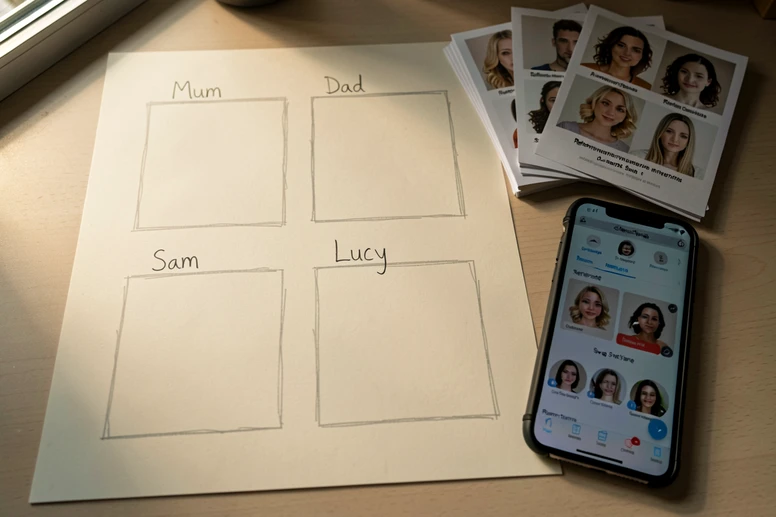
A face swap replaces one face inside a single photo. A photo montage is the layout that holds several finished images inside one canvas. Combine the two and you get a montage where each panel is a face swap: a 4-panel birthday card where every family member wears a different movie character, a 2-panel party invitation pairing two friends with historical figures, or a meme grid built from one source face dropped onto four targets.
Before you open any tool, gather these inputs:
- Source face photos. One clear, front-facing, high-resolution shot per person whose face will appear in the montage.
- Target photos or templates. The scenes, costumes, or bodies that will receive each swapped face.
- A face swap tool for Stage 1 (Pixlr or Higgsfield work well for beginners).
- A collage tool for Stage 2 (Canva, Adobe Express, or PicMonkey).
Decide the layout in advance. A 2-panel grid needs two swaps. A 4-panel birthday collage needs four. Knowing the panel count up front tells you exactly how many swaps to budget, which matters when free-tier daily limits enter the picture.
Prepare your photos before any face touches a swap tool
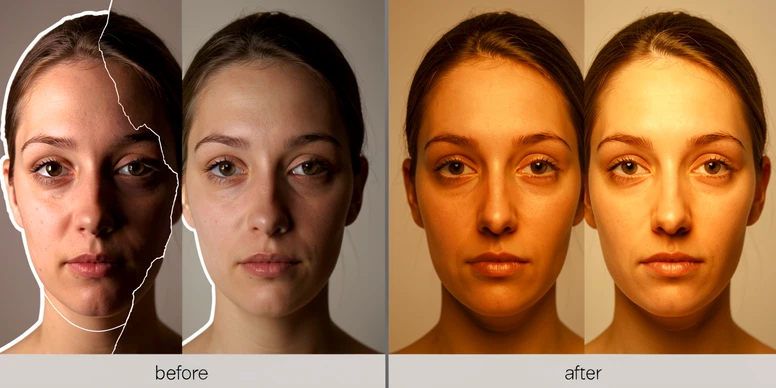
Input quality decides output quality. The kaylabrint.com Photoshop guide puts it bluntly: source and target photos should be taken in the same lighting conditions and edited with identical settings. The HeyGen team adds the same advice for AI tools, calling for high-resolution images with clear, unobstructed, front-facing faces and no hair, glasses, or props in the way.
Run this checklist on every photo before uploading:
- Use high-resolution images. Blurry or compressed faces confuse the facial-landmark detection inside any AI swap tool.
- Keep faces front-facing or only slightly turned. Extreme profiles produce distorted swaps.
- Clear obstructions. No sunglasses, hats, hair across the cheek, or hands near the chin.
- Match lighting direction across all panels. If one source is lit from the left and another from the right, the finished collage will look stitched together by accident.
- Apply identical brightness, contrast, and color-temperature settings to every photo before swapping. This is the single biggest fix for an inconsistent montage.
Pro tip: pick one aspect ratio for every target photo before you start. All square, or all 4:3. Mixing ratios forces awkward cropping inside the collage tool later and eats time you would rather spend on the design.
Stage 1: produce each face-swapped image
Two free tools cover almost every beginner project: Pixlr for no-signup speed, Higgsfield as a backup with a daily quota. Run all of Stage 1 in a single session before you open the collage tool. Switching back and forth invites inconsistency between panels.
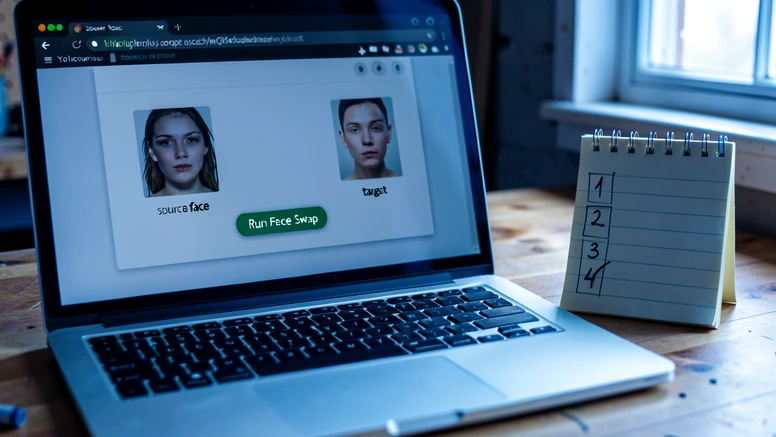
Method A: Pixlr AI Face Swap
Pixlr delivers results in just a few seconds and outputs PNG files, according to its own product page. No account is required, and the company states that creative output remains private and owned by you.
- Open pixlr.com/face-swap/ in any browser. No sign-up, no extension.
- Upload your source face photo (the face you want to use).
- Upload the target photo, or pick a template from Pixlr's library, then click Run Face Swap.
- Download the result as a PNG and save it into a dedicated project folder before starting the next swap.
Repeat for every panel. A 4-panel collage needs four PNGs in the folder before you move on.
Method B: Higgsfield, with a daily quota to plan around
Higgsfield gives free users 5 face swap generations every day. The limit, per Higgsfield's own face swap page, resets typically 24 hours after the first swap. Processing time depends on subscription type and current server load, ranging from 30 seconds up to 2 minutes.
- Go to higgsfield.ai and open the Face Swap tool.
- Upload a clear, front-facing source face photo. Higgsfield enforces strict policies against non-consensual use, so use only faces you have permission to swap.
- Choose the destination photo, then click Generate. Wait 30 seconds to 2 minutes for the result.
- Download and save to your project folder. Repeat up to the 5-per-day cap.
If your montage needs more than five panels in one sitting, do the first five in Higgsfield and run the remainder through Pixlr. Splitting across two days also works, but lighting conditions in your editing app may drift, so the same-day, two-tool route is usually safer.
Stage 2: assemble the swapped images into a single montage
Open a free online collage tool. Canva, Adobe Express, and PicMonkey all support multi-image grid layouts at the free tier. The exact menu names vary, but the steps are the same.
- Create a new canvas. Choose a grid or collage template that matches your panel count: 2-panel for a paired invite, 4-panel for a birthday card, free-form for a meme layout.
- Upload every face-swapped PNG from your project folder. Keep files in PNG to preserve the quality you got out of the swap tool.
- Drag each image into a panel slot. Use the corner handles to scale and reposition until faces appear at the same relative size across the grid.
- Use the Fade or Opacity slider, where the tool offers one, to verify alignment between panels and check for hard edge seams.
- Add text, borders, or a unifying background color. A consistent border color does most of the heavy lifting for visual cohesion.
- Export as a single PNG or JPG at the highest resolution available.
PicMonkey note: the background remover tool requires a Pro subscription. On the free plan, use the manual eraser instead. The PicMonkey blog also flags a quiet beginner trap: until you click the padlock icon in the Layers panel to unlock the photo from the canvas background, no edit will register. If your eraser appears to do nothing, that padlock is the reason.
Want a worked example? A family keepsake montage repairs a holiday group photo where one child had eyes closed: swap the child's face from a separate shot, then drop both images into a 2-panel layout with a thin white border between them. Same lighting, same scale, no seams. That's the entire goal.
Mistakes that ruin a face swap montage, and how to fix them
Most failures fall into a small set of patterns. Here's the diagnostic table, then the fixes:
| Symptom in your montage | What's actually wrong | Fix |
|---|---|---|
| Panels look like they came from different photographers | Mismatched lighting across source photos | Apply identical brightness, contrast, and color temperature to every source and target before swapping |
| One face looks oversized next to the others | Inconsistent face scales across panels | Use the corner handles in the collage tool to resize each panel image until faces are the same relative size |
| A visible line traces the swapped face | Hard edge seam between face and target body | Soft-edge eraser brush in Photoshop or PicMonkey, feather the boundary; switch brush color from black to white to restore over-erased areas |
| Tool rejects the upload or returns a blank result | Face not detected | Use a higher-resolution, front-facing photo with no hair, glasses, or hat covering the face |
| Eraser does nothing in PicMonkey | Photo still locked to the background layer | Click the padlock icon in the Layers panel to unlock |
| Mid-project, Higgsfield says you've hit the cap | 5-per-day free tier exhausted | Finish remaining panels in Pixlr, or wait for the 24-hour reset |
If two panels still look mismatched after assembly, the issue is usually skin tone. Drop the lighter panel into a free editor like Photopea, nudge hue and saturation a few points toward the warmer panel, and reimport. The shift takes a minute and saves the whole collage.
Faces at different angles deserve a separate note. If one swapped face points slightly left and another points slightly right, flip one horizontally with the rotate or flip control in the collage tool. The eye tracks symmetry, and a balanced grid reads as deliberate.
Ethical and privacy checklist before you share the montage
HeyGen's published guidance for face swap creators is a good baseline: always get consent for faces you swap, mark face swaps as edited, avoid false or harmful content, and respect copyrights and image rights. Higgsfield enforces the same principle on its end with strict policies against non-consensual use.
- Get explicit consent from every person whose face appears in the montage before publishing.
- Add a small "AI-edited" label in the corner of the final image. It satisfies platform policies on synthetic media and removes most ambiguity.
- Never use a face swap to deceive, impersonate, or mislead. Deepfakes used for scams or misinformation are illegal.
- Do not use faces of minors without explicit parental consent.
- Read the privacy policy of each tool. Some upload face photos to cloud servers; check whether your images are deleted after processing.
- If the montage will be used commercially, confirm the tool's commercial-use terms. Higgsfield, for example, includes commercial rights with all paid Pro plans, not the free tier.
One last habit worth keeping: save every face-swapped output at full resolution before you crop or scale. You can always shrink an image inside the collage tool. Recovering detail from a downsized PNG is not on the table.
ok so i've done maybe 40 of these montages last year for a small print job and basically every line in this article is half right at best. pixlr is fast yeah but the output is not always png on my end, sometimes i get a jpeg, no idea why.
+1
the lighting bit is the only thing that actually matters and they buried it
reading on lunch, will try the pixlr route tonight
@Luffy yeah and even the lighting fix doesn't save you if the source face is too small. i had a batch of 23 photos where every source was like 600px wide, no amount of brightness matching fixed it.
wait, the article says higgsfield gives 5 per day. last i checked it was 3 and they wanted email verification, might be different now
@KuroKy could be region locked, mine sits on 5 on a US ip
sounds like a press release
is pixlr really free for commercial use though
@Acharya Prashant no, free tier is personal only, you need to read the fine print. i got a takedown last spring for a flyer i did for a friend's bakery, technically commercial.
author clearly never shipped a multi panel print job
the bit about identical brightness across all sources is good advice but the part where they say "this is the single biggest fix" is just wrong. skin tone calibration matters more, i tested it on 17 panels.
@Sneaky agree, skin tone destroys the illusion way before lighting does. i usually nudge saturation down 4-7 points on the lighter face.
anyone else worried about the cloud upload thing
@Gil Croes pixlr keeps it for 24h then deletes, higgsfield says same but who actually verifies. i don't upload anything sensitive but for client work i ask first.
so basically you need two tools, a folder structure, and a print budget. cool.
skimmed it ngl, anyone got a tldr for the picmonkey padlock thing
@Gotaga the photo is locked to the canvas by default, eraser does literally nothing until you click the lock icon. took me 30 min to figure out the first time, no error message.
lol the padlock thing got me too
why is no tool just telling you that on screen
because then they'd lose the pro upsell, my guess
i used canva for the collage step on a 4 panel birthday card last month. the corner handle resize is fine but it kept snapping to grid even when i held shift. might be a browser thing, idk.
@neymarjr chrome on win11 has that snap issue, firefox doesn't. weird quirk.
ok so on phone in the subway, will redo later but the pixlr link in the article goes to a page that wants login for me, am i missing something
@nytimes mobile pixlr is locked behind their app, desktop browser is the no signup version. article should mention this and doesn't.
this was the most useful part of the thread tbh
sure, in a perfect world every source photo is front facing with no glasses. half my family wears glasses.
@Sykkuno glasses are the worst, you basically have to do a separate erase pass after the swap. i timed it once, adds like 4 minutes per panel.
gave up on face swap stuff a year ago, results were terrible. maybe better now but i'm not paying to find out
higgsfield free tier is enough for personal stuff right
@Acharya Prashant for a single 4 panel collage yes, for anything bigger you split across days or use pixlr for the overflow. article actually gets this part right.
the aspect ratio tip is underrated. i did a 6 panel grid where i mixed 4:3 and square and the collage tool cropped two faces off completely.
@Sneaky yep, decide ratio before you start, do not figure it out in canva at midnight
the consent bullet at the bottom feels like a legal disclaimer they had to add
because it is. nobody asks consent for meme grids and we all know it
that's the part i actually disagree with the article on. for any face that leaves your own phone you should at least ask. learned the hard way when a cousin got upset about a christmas card.
how upset are we talking
@KuroKy enough that we don't do family photo group chats anymore. it's been 137 days, nobody has reposted one.
oof
will check from desktop tonight
is photopea actually free or is there a catch
@Cabochard fully free for the photoshop clone part, ads on the side. no upload limit i've hit.
photopea is solid, only thing it lacks is real time collab but for solo montage work it's better than gimp
the diagnostic table is good but "oversized face next to the others" is not always a resize problem. sometimes the swap tool itself enlarges the face during landmark detection. resizing in canva makes it worse.
@Sneaky that's the higgsfield bug specifically. pixlr doesn't do it as far as i can tell.
on paper maybe
how much time does a 4 panel actually take start to finish realistically
@nytimes if your sources are clean, maybe 25 to 30 min. if you have to fix lighting first, double it. add another 15 for the collage assembly.
that's basically half an evening for one card. not worth
depends what you're saving on. printed cards at the store are like 8 bucks each
the article doesn't mention that some face swap tools watermark the free tier output
@KuroKy pixlr doesn't watermark, higgsfield doesn't either as of last week. some random ones do, can't remember what they're called, started with a V i think
vidnoz?
@Gil Croes that's the one, yeah
vidnoz watermarks and also keeps the upload, hard pass
yikes
side question, has anyone tried doing the swap inside photopea directly using the manual face composite method instead of an AI tool
reading on phone in the subway, what's the manual method
basically you cut the face, paste on the target layer, mask the edges, color match. no AI. takes longer but you get full control and zero upload.
this is what i'd want for anything i actually care about
manual is slower but the result is consistent across all panels because you control every step. for 2 panels it's fine, for 8 you'll lose your mind.
no idea what masking edges means but ok
the kaylabrint guide they cited is from like 2019 if i remember right, half the photoshop menus moved since then
@KuroKy checked it a year ago, might be different now but yeah the UI screenshots were ancient
why are we still citing 6 year old photoshop tutorials in 2026
because nothing new actually replaced them
the ethical checklist at the end, does anyone actually add the AI-edited label
i do on anything that goes on instagram, not on private group chats. it's 4200 followers, not worth the platform flag.
is the label required by law somewhere
@Acharya Prashant EU AI act covers some of it now, depends on whether the image is clearly satire or not. not my area beyond that.
and the enforcement is basically zero unless you go viral
one thing nobody mentions: higgsfield's daily reset is not 24h from your first swap, it's a rolling window from each swap. tested it on 4 different days.
@Sneaky huh, that contradicts what they say on their page. annoying.
will test this weekend, easy to verify
how do you screenshot a rolling timer though
timestamps in the dashboard, they show when each generation was made
wait, anyone got a free alternative to canva for the collage step that doesn't require an account at all
+1 on this, hate the canva signup wall
photopea has a collage template if you dig for it, no account. menus are not obvious though.
or you can just open a blank 1920x1080 canvas, drag your PNGs in, and align manually. the "collage tool" abstraction is mostly marketing.
so what's the actual best workflow if you've done a dozen of these
pixlr for swaps, photopea for the assembly, no canva at all. but honestly i'm not fully sold on any of this, every time i think i have a clean pipeline a tool changes its free tier and i'm back to...