Getting genuinely filter-free face swaps: cloud limits versus local tools
The only face swap setup with zero content filtering runs on your own hardware. Cloud services that advertise 'no content filters' still enforce a written content policy, so the genuinely unrestricted path is a local open-source tool: FaceFusion, ReActor, or Roop. None of them upload your images, and none apply a classifier. This guide shows which cloud tools are least restrictive for safe-for-work creative jobs, how to install the three local options step by step, what technically triggers a filter so legitimate work stops getting blocked, and the consent and deepfake laws you need to weigh before swapping a real person's face.
What 'uncensored' actually means, and what it doesn't
The marketing headline and the policy page rarely agree. ZenCreator promotes 'no content filters' and 'no account bans' on its unrestricted AI page, while the same site spells out a content rule that flatly forbids explicit material.
Adult content, explicit nudity, and sexually explicit material are strictly prohibited on this platform. Users may not create, upload, or generate such content. (ZenCreator content policy)
That is the gap to internalize before you trust any 'unrestricted' badge. WaveSpeed, Higgsfield, Magic Hour, Pixlr, and EaseMate all enforce consent and non-deceptive-use rules regardless of how the landing page reads. WaveSpeed, for instance, asks users to 'always obtain consent when using someone else's likeness' and to never create deceptive content. The label changes; the underlying policy does not.
So where is the actual filter-free zone? On your own machine. A local open-source swapper processes everything offline, which means no classifier sits between you and the output. Every cloud option, marketing aside, keeps a policy you can violate. Only local processing removes the filter as a technical fact rather than a promise.

What trips a content filter, and how to clear legitimate work
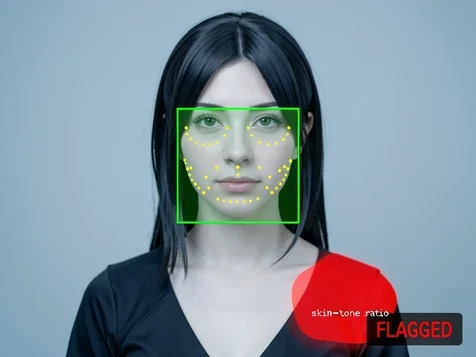
Cloud tools run your upload through image classifiers before they ever swap a face. Those classifiers score skin-tone ratios across the frame, detect body pose, and match keywords in any text field you fill in. A cosplay shoot with bare shoulders, a film still with a fight pose, an illustration reference for adult fiction: each can cross a threshold the model was tuned to catch, and the block arrives with no explanation.
Anomalous-looking inputs make a false positive more likely. When lighting between source and target clashes, when the angle is extreme, or when resolution is low, the rendered output drifts from what the classifier considers normal, and a borderline score tips into a rejection. Clean inputs help you pass for the same reason they produce a better swap.
If your work is genuinely safe-for-work and still gets stopped, a few habits cut the false positives:
- Shoot or crop the source against a plain, neutral background so the classifier has less skin area to weigh.
- Skip suggestive poses in the target frame, even when the subject is clothed.
- In any prompt or caption field, describe what you want in concrete, descriptive language rather than categorical labels the keyword matcher is trained to flag.
- Try an image-only submission first. Many classifiers police text inputs harder than the images themselves, so dropping the prompt entirely can clear a request that the same tool just rejected.
Legal and consent requirements before you proceed
Using a real person's likeness without permission can be illegal or civilly actionable in many jurisdictions, and the tool you pick does not change that. Going local removes the content filter, not the law.
Non-consensual intimate imagery made with deepfakes now carries criminal exposure across major legal systems. The United States DEFIANCE Act, the United Kingdom Online Safety Act, and provisions in the EU AI Act all target this category directly. These are not theoretical statutes; they create real liability for the person who creates and shares the output.
Consent is the through-line. Get explicit permission, ideally written, from anyone whose face you use, and treat that as mandatory for any mature, commercial, or publicly shared result. There is a data-protection layer too. Under GDPR and CCPA, a face photo is biometric data, so uploading a third party's image to a cloud tool without their consent can count as unlawful processing on its own, separate from whatever you do with the swap. That is the honest answer to whether face swapping is 'safe': the technology is fine, the exposure comes from whose face you feed it and where the file goes.
Picture a filmmaker swapping a lead actor's face onto a stunt double. The consent paperwork should cover the actor's likeness for that specific use, and the smart move is a local tool so unreleased footage never touches a third-party server. One more habit reduces risk across the board: before you publish any swapped image or video, add a visible 'AI-generated / face swap' disclosure label, which lines up with the deepfake disclosure rules taking effect in several US states.
Option 1: the least restrictive cloud tools for safe-for-work jobs
When your content is clean but the filters are twitchy, the right cloud tool is the one with the least friction and the most honest data handling. None of the options below permit explicit output, so this is about getting legitimate creative swaps through quickly, not about evading a policy.
| Tool | Sign-up | Watermark | Free tier |
|---|---|---|---|
| WaveSpeed | Not required | None | Free, no fixed limit stated |
| Magic Hour | Not required | None on photos | Free, no fixed limit stated |
| Higgsfield | Account required | Not stated | 5 swaps per day |
| EaseMate | Required | None | 30 credits on sign-up |
The detail behind those rows matters more than the grid. WaveSpeed states that 'your images are processed securely and are not stored after processing,' which makes it the cleanest pick for frictionless one-off swaps. Magic Hour leans on automatic alignment and blending that it claims cuts manual cleanup by 70 to 90 percent, finishing most jobs in under a minute, good when you iterate fast. Higgsfield gives 5 free generations, but read the reset carefully: the 24-hour clock starts at your first swap of the cycle, not at calendar midnight, and it supports cross-style swapping between photos, paintings, and 3D models. EaseMate runs on GPT-4o blending, hands out 30 credits at sign-up, and confirms that 'the files you uploaded will be deleted from our server after processing.'
Option 2: local face swap with FaceFusion, no filters and no upload
FaceFusion is the most actively maintained open-source swapper, and it runs entirely on your hardware. Before you start, line up the prerequisites: Python 3.10 or newer, Git, and a CUDA-compatible NVIDIA GPU with 8 GB or more of VRAM for good speed. A CPU fallback works but is slow. The repository lives on GitHub.
- Clone the project: run
git clone https://github.com/facefusion/facefusion.gitthencd facefusion. - Install dependencies with
pip install -r requirements.txt, which pulls in onnxruntime, insightface, gradio, and the rest. - Let FaceFusion auto-download its ONNX models on first run, or manually drop
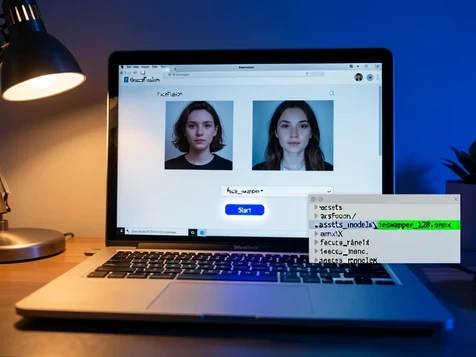
inswapper_128.onnxand the detection models into the.assets/modelsdirectory. - Launch the local UI with
python facefusion.py run, which opens a Gradio interface at http://127.0.0.1:7860 in your browser. - Upload your source face and your target image, set the processor to
face_swapper, then click Start and download the result.
Nothing leaves the machine at any step, so there is no upload and no filter. Processing a single image runs roughly 5 to 30 seconds on a modern NVIDIA card. FaceFusion handles video natively too, and the --execution-threads flag parallelizes frame work to cut render time. For the sharpest output, switch on the face_enhancer processor (GFPGAN or CodeFormer) alongside the swapper, since the swap step tends to soften fine facial detail.
Option 3: ReActor for ComfyUI
Already building in ComfyUI? ReActor adds filter-free face swap inline, so you stay in one graph instead of exporting frames to another tool. It installs as a custom node and injects the swap during generation.
- Install through ComfyUI Manager by searching 'ReActor' and clicking Install, or clone the repo manually into your
ComfyUI/custom_nodesdirectory. - Place
inswapper_128.onnxinComfyUI/models/insightface/. That exact path is required, and any other location throws a 'model not found' error. - If ComfyUI reports 'cv2 not found,' run
pip install opencv-pythoninside the ComfyUI Python environment and restart. - Add the ReActor node, wire your source face loader into
source_imageand your target or KSampler output intoinput_image, set a face index if the target has several faces, and queue the workflow.
No filter touches the output. What lands in your ComfyUI output folder is governed entirely by your local model and sampler settings, nothing else.
Option 4: Roop, the simplest local CLI
Roop is the lowest-barrier local route. One command, no UI, no node graph. It suits anyone who wants a quick swap without standing up a full ComfyUI install.
- Install with
pip install roopon Python 3.10, then putinswapper_128.onnxin themodels/directory inside the Roop folder. - Run the swap:
python run.py --source face.jpg --target photo.jpg --output result.jpg. - For GPU speed add
--execution-provider cudaon NVIDIA or--execution-provider coremlon Apple Silicon; leave it off for CPU-only. - The result writes to your
--outputpath, with no cloud upload and no filter.
One caveat. Roop development has slowed, and FaceFusion is the actively maintained fork that grew out of it. For a brand-new setup, start with FaceFusion and treat Roop as the minimalist fallback.
Input preparation checklist for realistic results
Output quality is decided before you press Start. Whether you run cloud or local, the same input factors determine whether the swap looks real or melted:
- Source face: clear, well-lit, front-facing or close to it, with nothing covering the face such as glasses or stray hair.
- Target image: face fully visible at an angle and lighting close to the source.
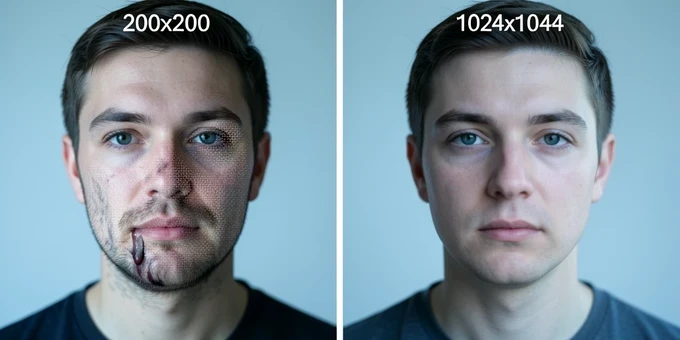
- Resolution of at least 512x512 for usable output, and 1024x1024 or higher for professional work.
- Format JPG, JPEG, PNG, or WEBP, kept under 10 MB for cloud tools.
- Match skin tone and lighting between the two photos, which is what keeps the blend edge from showing a seam.
Troubleshooting common failures
Most failures trace back to one mechanical cause. Match the symptom to its reason and the fix is usually a single change:
| Symptom | Why it happens | Fix |
|---|---|---|
| Cloud filter blocks safe-for-work content | The classifier scores the image as borderline | Switch to a less aggressive tool like WaveSpeed or Magic Hour, or move to local processing |
| Blurry or distorted output | Source resolution is too low for landmark mapping | Use a clear source of at least 512x512 |
| Visible seam at the face boundary | Lighting differs between source and target | Reshoot or pick a target lit like the source |
| Wrong face swapped in a group photo | The tool defaulted to a different face | Use face-selection controls or crop to isolate the intended face |
| 'Model not found' on a local tool | inswapper_128.onnx sits in the wrong directory | Confirm the path: ComfyUI/models/insightface/ for ReActor, models/ for Roop, .assets/models/ for FaceFusion |
| CUDA out of memory | The job exceeds available VRAM | Lower the input resolution or fall back to the CPU execution provider |