Replace a Head With an Object: The Surreal Portrait Walkthrough
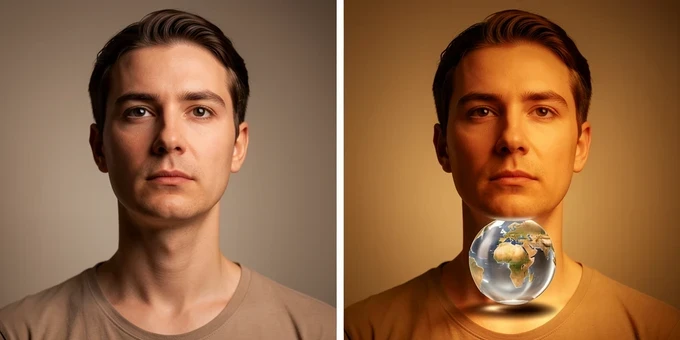
You want a portrait where a glowing lightbulb, a spinning globe, or a bloom sits where the head used to be, and you want it to look attached rather than pasted on. Two routes get you there. Mask the object onto the neck by hand in Photoshop or Photoshop Elements, or skip masking entirely and describe the object-head in an AI tool like Picsart or Dzine. Either way, the believability comes from three things the swap itself never touches: scale, perspective, and a real cast shadow.
Before any of that, you need a body photo with a clear neckline and a clean object photo lit from the same direction. Get those two inputs right and the compositing is short work. Get them wrong and no amount of brushing will hide it.
What a surreal object-head swap is
It is surreal art where an everyday object stands in for a person's head. Not a second face. An inanimate thing, chosen for what it means. That single choice changes which skills matter.
A face swap changes only the facial features. A head swap, by Dzine's own definition, replaces the entire head including the hair, ears, and neck. Both of those are exercises in blending one human anatomy into another, where the hard part is matching skin tone and softening edges where two people meet. An object-head throws that work out. A lightbulb has no skin to match and no hairline to feather.
So the difficulty moves. Instead of facial blending you fight scale, perspective, and shadow. Does the object sit at a size a head would occupy? Does its angle agree with how the body is turned? And does anything anchor it to the shoulders, or does it hover an inch above the neck like a sticker? Those three questions decide whether the piece works.
Choose your object and concept first
The object carries the meaning, so decide it before you touch a tool. A lightbulb says ideas. A globe says travel or wanderlust. Blooming flowers say growth. The strongest object-heads are the ones where the viewer reads the symbol in half a second and the portrait's mood agrees with it.
Then there is the boring physical constraint that makes or breaks the composite: the object needs a believable bottom. Something with a natural base, a vase, a jar, a lamp, can rest on a neck the way a head does. A perfectly round object, a billiard ball or a bare globe, has no contact point, so you will be hand-painting a shadow to convince the eye it touches the body at all.
One more decision belongs here, not later: which way the object faces. If the body is turned three-quarters to the left, an object with an obvious front, a clock face, a camera lens, a flower's open bloom, should face that way too. Matching the object's facing direction to the pose up front saves far more time than correcting it after everything is composited.
Source the two images
You need two photos: the body, and the object on a simple background. The cleaner the object's backdrop, the looser your selection can be, because there is less clutter to mask away around it.
Lighting is the input that quietly decides everything downstream. Head-swap photographers shoot both frames back-to-back, subjects in nearly identical positions and matched light, exactly because fixing a lighting clash afterward is miserable. Borrow the logic. If the body is lit from the left, find or shoot the object lit from the left. A flower glowing on its right side grafted onto a left-lit shoulder will read as fake no matter how clean your mask is.
- Body photo: clear neckline, no hair or collar crowding the spot where the object will sit.
- Object photo on a plain background, lit from the same direction as the body and facing the same way the body is turned.
- Skip anything backlit or with a busy reflection: those edges fight you at the masking stage.
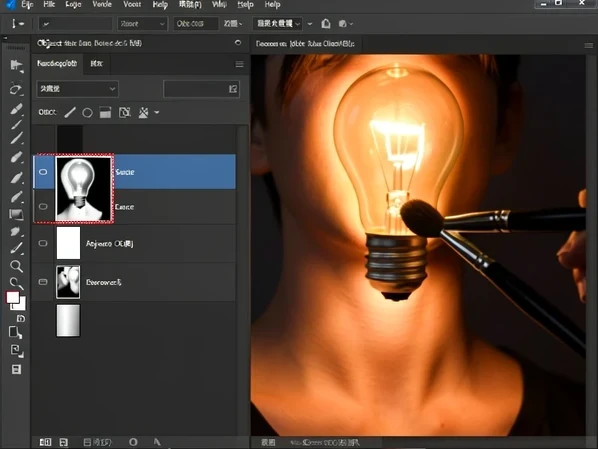
Manual method: composite the object onto the neck
Open both files in Photoshop or Photoshop Elements and decide where the object attaches and roughly how large it should read on the neck. Then walk the layers.
- Select the object loosely with the Lasso tool, deliberately over-selecting. Digital Photography School's head-swap guide puts it plainly: excess area is easy to mask off later, but area you failed to include cannot be added back without starting over.
- Copy and paste it onto the body photo. It lands as a new layer above the body.
- With the Move tool, drop that layer to about 50% opacity so the old head shows through, slide the object into place over the neck, then return it to 100%. This positioning trick comes straight from standard head-swap workflows.
- Use Free Transform to scale and rotate the object until its size and angle match the body's pose.
- Add a layer mask. Brush soft black to hide the excess and reveal the body around the object, brush white to restore anything you take too far.
The mask is the whole game, and one rule runs it: black conceals, white reveals. Press X to flip your brush between the two as you work, so you can hide and recover without breaking stride. Brush at full opacity with black to cut the object cleanly into the shoulders, switch to white the moment you eat into the object itself.
On Photoshop Elements 8 or lower there is no built-in mask button. You need a free downloaded layer-mask action installed first, a workaround documented by The Click Community. Newer Elements and full Photoshop add the mask in one click.
Finish by painting the shadow and grading color, covered next, then flatten and save. Keep an unflattened copy of the layered file so you can re-edit the mask later without rebuilding the whole composite.
Make it believable: shadow, lighting, and color
A clean mask gives you a cut-out. This is the part that turns the cut-out into a photograph the eye accepts. Three passes do it, and skipping any one is what gives away most object-head attempts.
Shadow first, because it is the one readers notice without knowing why. Where the object meets the neck and shoulders, paint a soft shadow on a new layer, following the body's light direction. A floating object with no contact shadow looks pasted on, full stop. Round objects need this most: a bare globe has no base, so the painted shadow is the only thing telling the viewer it rests on something.
Then lighting and color. Match the light's direction and intensity from object to body so highlights fall on the same side of both. Finally, color-grade the object to the scene's temperature. Warm a cool object to sit under a sunset-lit portrait, cool a warm one for a daylight scene. That single grading pass, unifying object and body into one color temperature, is the difference between a convincing surreal piece and an obvious collage.
Watch perspective alongside scale. An over-large globe dropped on the neck looks like a beach ball someone is holding. Shrink it with Free Transform until it occupies the space a head actually would from the camera's angle, and the surreal logic clicks into place.
AI shortcut: swap the head for an object with a prompt
No masking, no Lasso, no patience for layers? Describe the result in words instead. Two tools handle an object-head this way.
In Picsart AI Replace, upload the body photo, brush over the head area, choose Replace, type a description of the object or pick a preset, then click Generate Image. The brush marks the region; the prompt decides what fills it. In Dzine, open the Chat Editor and enter a command describing the object-head you want, the same Chat Editor flow Dzine uses to swap heads in seconds after you upload the base photo.
The prompt is where beginners win or lose. Do not type 'lightbulb head'. Name the object, its lighting, and how it attaches: 'a glowing lightbulb where the head should be, lit from the left, resting on the neck'. Spelling out light direction and attachment point gives the model the same information you would have hand-painted, and the results jump accordingly. Generate, review the scale and attachment, and refine the prompt if the object hovers or sits too large.
On output: Dzine states that free credits let you perform swaps and download results without watermarks, worth verifying against its current policy before you rely on it. That clean download is the practical reason many creators reach for the AI route over a paid export elsewhere.
Common mistakes and quick fixes
Most failed object-heads die from the same handful of slips. Each has a one-move fix.
| What goes wrong | Why it breaks the image | The fix |
|---|---|---|
| You brush and nothing blends, the object just gets darker | You are painting on the object's image pixels, not on the active mask, so black adds paint instead of hiding | Click the white layer-mask thumbnail next to the object layer until it is outlined, then brush black |
| The Move tool drags the whole picture, not the object | The wrong layer is active | Click the object layer or its mask in the layers panel to select it first |
| The mask leaves hard, jagged edges or you cannot blend at all | The Lasso selection was too tight and clipped the object | Reselect with a loose, generous Lasso, leaving room around the object |
| The object reads as floating and obviously cut out | There is no cast shadow tying it to the body | Paint a soft shadow where the object meets the neck, following the body's light |
The first row is the one that catches everyone. If your black brush seems to do nothing useful, you are almost certainly on the image layer, not the mask. The Click Community flags this exact slip: brushing the image edits pixels instead of revealing or hiding, so the blend cannot work. Check that the mask thumbnail is outlined, and the rest falls into place.
the 50% opacity thing is the actual trick here. drop the object layer to half, line it up over where the old head sits, bump it back to 100. lined up a globe perfect on the first go after fighting it blind for ages
wait that opacity tip is the only reason i clicked, ngl. been eyeballing placement like an idiot
ok so does the 50% thing work in elements too or just full photoshop?
elements yeah, the move tool opacity slider is the same. the part that differs is the mask button
lined up perfect on the first go, sure, in a perfect world. it still depends entirely on whether your object photo is shot at the same angle
the opacity trick is for position not perspective, those are separate problems. the article literally splits them
is picsart fully free for this or does it gate replace behind a sub
picsart gates a lot now. ai replace eats credits last i checked
dzine is the one that does no watermark on free credits per the article. that's the budget move
article says verify that against current policy though. free no watermark deals never last
used to be unlimited-ish on dzine, now it's credits. last i looked it was around 50 free, no clue if still true
just tried the lightbulb head thing and the prompt advice is real, typing lit from the left resting on the neck changed everything
ok so you brushed the head area first then typed that in picsart?
yeah brush over the head, replace, then the full prompt. kinda wild how much the attachment line matters
brushed mine 14 times and it kept hovering. gave up
same, the hover problem is exactly why i stopped. nobody tells you the shadow is on you to fix even in ai
the article does say review scale and attachment and refine the prompt. ai isn't one shot
refine the prompt means burn more credits, which is the whole racket
the loose lasso point is underrated, over-select and mask off later, you cannot add back what you clipped. learned that the hard way once
^ this. tight lasso ruined like 3 of mine before i read that
press X to flip black and white is such a small thing but it honestly saved my wrists
that's the one tip i'd keep on a sticky note. black conceals white reveals, X toggles
for elements 8 you actually need a downloaded mask action first, no built in button. found that out after an hour hunting for a button that doesn't exist
elements 8 in 2026, respect honestly. why
it's what's on the old laptop, not paying for a sub to drop a head onto a vase lol
the round object problem is the real filter. a billiard ball has no base so the whole composite lives or dies on a hand painted shadow
right, vase or jar or lamp gives you a contact point. picked a lamp for exactly that reason
globe head looked like someone holding a beach ball until i shrank it. the scale note is dead on...
wait how small did you actually go? mine still reads too big
color grading is where mine always falls apart. warm object cool scene and it screams collage
matching temperature is the last pass and the one people skip. the article calls it the difference between convincing and an obvious collage, agree fully
tbh i skimmed the color part, grading scares me
does the facing direction thing actually matter that much? like the clock face pointing the same way as the body
for objects with an obvious front yeah. a camera lens or open bloom facing away from a three quarter pose looks wrong instantly
on paper maybe. half the time the viewer doesn't clock direction, they clock the shadow
disagree, facing reads subconsciously. but shadow is the bigger one, i'll give you that
the shadow vs facing thing, classic. both matter, neither saves a bad source photo
cheapest path is still manual in elements if you already own it. ai credits add up fast
depends, a 230 credit pack on dzine lasted me months doing maybe 12 swaps
230 for 12 swaps isn't bad actually
it was a promo, normal price is higher now i think. could be wrong
the back to back shooting tip for lighting is genius for people who shoot their own object photos
ok so shoot body and object in the same light same session, then you barely fix anything later
exactly the logic. a left lit body needs a left lit object or the graft reads fake no matter the mask
cool if you have a studio. rest of us are grabbing object photos off the internet with random lighting
that's my whole problem too, found object always lit wrong
the unflattened copy advice saved me, flattened mine once and couldn't touch the mask after. keep the layered file
the common mistakes table is the only part worth printing. brushing the image instead of the mask is 90% of the why won't it blend posts everywhere
that was literally me, black brush just made it darker and i panicked
because you were on the image layer not the mask. click the mask thumb till it's outlined, then black
yep figured it out after, the outlined thumbnail is the tell
wish i read that table before instead of after lol
tried picsart ai replace like a year ago, results were mush. might be better now idk
it's way better now, the brush region plus prompt combo is solid for a lightbulb at least
what about a globe in picsart? the round ones still hover for me even with the attach line in the prompt
round objects hover everywhere, ai or manual. it's the no base problem the article keeps hammering
so basically pick objects with a flat bottom and save yourself the pain
pretty much. vase jar lamp. a flower in a vase too since it can sit in the collar
a cut bloom has no base either, you're imagining a stem that isn't in frame
fair, i was picturing a flower in a vase not a cut bloom. scratch that
nobody's mentioned how long the manual route takes. spent like 3 hours on one globe and it's still meh
3 hours sounds about right for a first one sadly
the ai route is 30 seconds vs 3 hours though, that's the actual tradeoff
30 seconds to generate, then however long refining the prompt and burning credits. not free time either
everything's a tradeoff between your time and your credits ngl
anyone know if photoshop on ipad has the mask action problem like elements 8?
the X toggle works on ipad i think, not sure about the mask button though
no idea on the ipad version, never touched it
the whole free no watermark on dzine was why i tried it and then the policy changed mid project. burned me
policies always change once you depend on them. verify before you rely, like the article says, learned that too late
that's why i screenshot the credit terms now before starting anything
circling back, the misread i keep seeing is people thinking head swap and object head are the same workflow. they're opposite, one blends anatomy one throws it out
the article's own line, an object head has no skin to match and no hairline to feather. the work moves to scale perspective shadow
so face swap is the easy one and object head is the hard one? figured it'd be the other way
different hard, not harder necessarily. you trade blending for physics
physics in a head swap, didn't have that on my bingo card lol
just did a lightbulb one start to finish and the glow selling it was all in the shadow under the chin
post it somewhere? curious how you handled the glass edge
had a weird thing happen with the glass, separate story
cheapest believable result for me was a lamp head, manual, elements. zero credits and the contact point is built in
lamp head is smart, the base does half the work for you
it does, but a lamp says nothing symbolically. you solved the composite and lost the meaning
so what object actually reads as a clear symbol and still has a base to sit on?